A Fancy French Provincial Desk

French Provincial Desk After

Oh my goodness, I was so happy to have found this gorgeous little sassy desk on craigslist,  I see french provincial pieces from time to time, but they are usually too expensive for my taste, so when I saw this pop up right in my range, I snagged it right away. The thing with these french provincial pieces are they truly can go into any room and just spruce it up. The desk was a little dull when I got it, but I decided to go simple on this piece and just let the lines speak for themselves. I used Annie Sloan Chalk Paint in Old White using my Chalk Painting Process and the original hardware sprayed with a dark silver and brushed lightly with Old White.

French Provincial Desk Before

French Provincial Before Drawers

French Provincial Desk After

French Provincial Desk Drawers After

French Provincial Desk redone by Happy Chapter

What do you think? This piece sold before I even listed it, but if I had it for a minute, it would have gone just beautifully in our guest room. Where would you place it?


Continue Reading

Sprucing Up Old Drawer Pulls

Dresser After by Happy Chapter in Annie Sloan French Linen

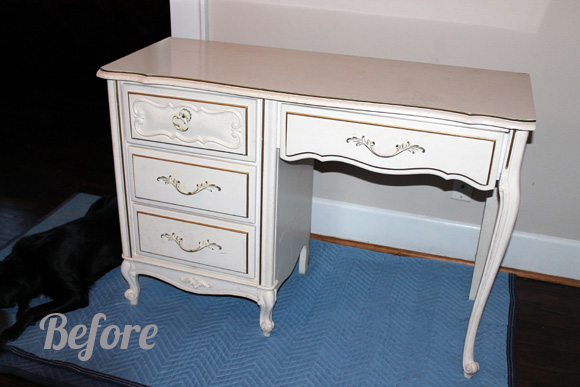
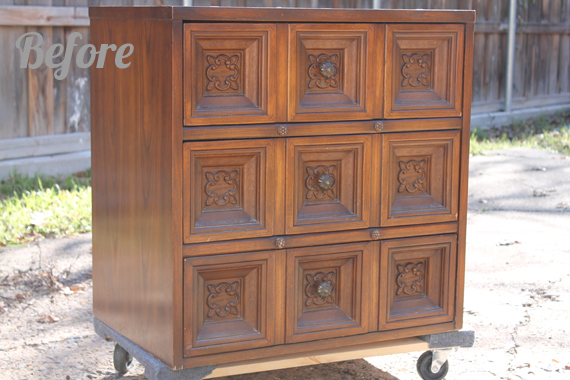
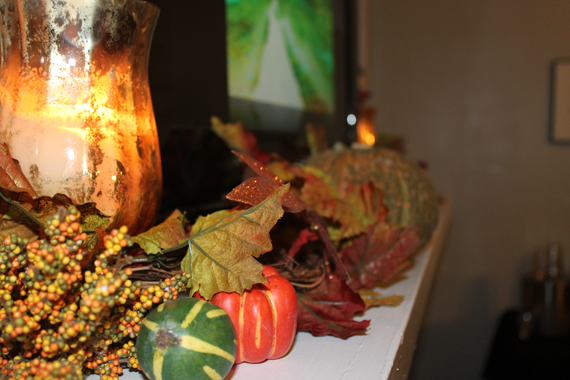
Howdy! So I have to start this one saying, shame on me for not taking enough before pictures. It’s really hard to show you a transformation without the before’s, but I’ll do my best. I was really excited to work on this dresser, because I knew just what I wanted to do with it, but the most fun was creating a fresh fun look for the drawer pulls.

Dresser Upcycle - Before Picture

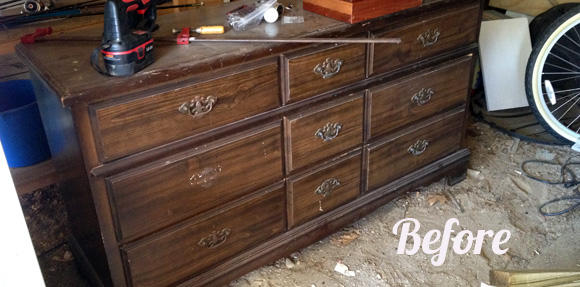
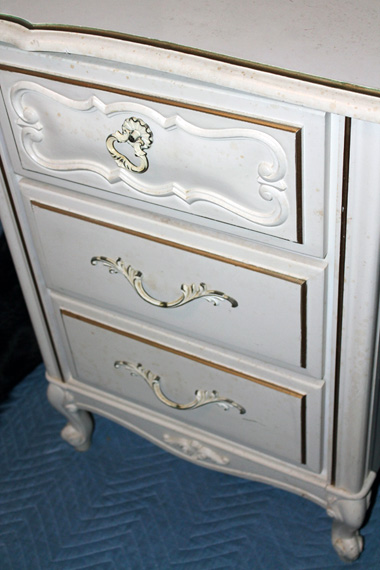
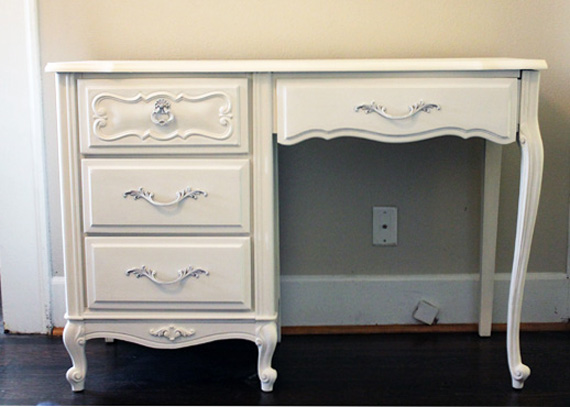
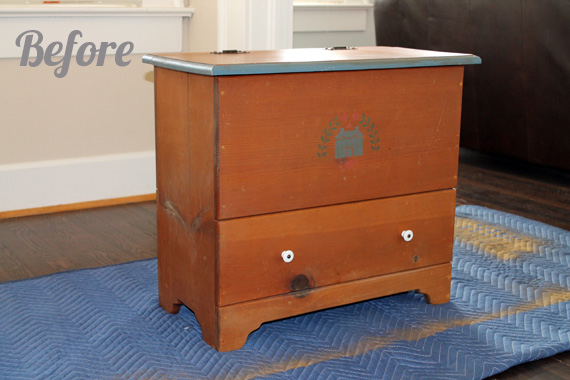
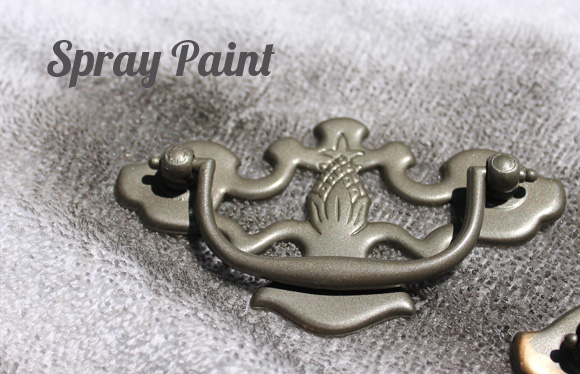
Here is what I started with…not so much, right?! (Sorry about the horrible photo, only one I took) This was just an old dresser I found at Goodwill, it had great bones and just needed to be cleaned up, so I did it! Take a gander at the drawer pulls, they really were in pretty good shape, they just needed some cleaning up and a little love so I decided to keep them instead of replacing them. I popped into my favorite place, Hobby Lobby and looked for a nice spray paint and some Rub n’ Buff. I decided on a Krylon color called Antique Bronze, I thought it would look gorgeous and offer just enough contrast from the Antique Gold Rub n’ Buff. If there isn’t a Hobby Lobby near you, any craft store should carry it, or you can grab it on Amazon here.

Krylon Antique Bronze Spray Paint and Rub n' Buff in Antique Gold

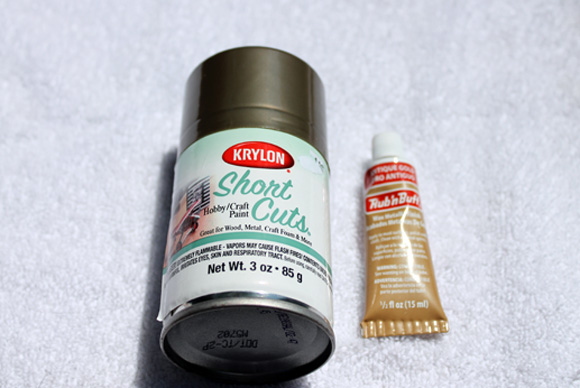
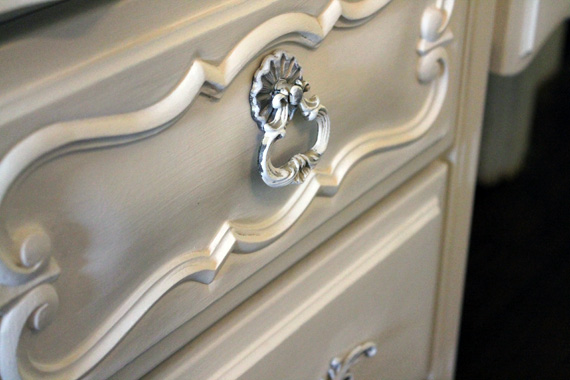
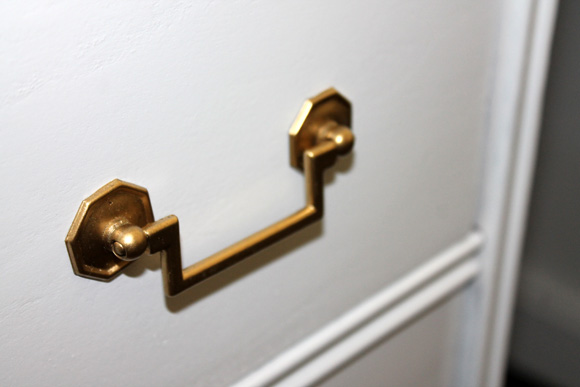
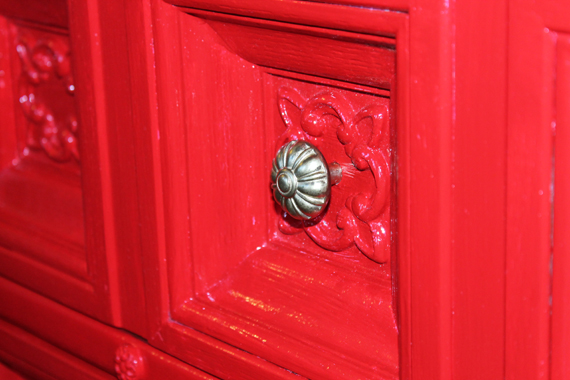
First I sprayed all of the pulls and waited about 25 minutes for them to dry. Once they dried, I applied the Rub n’ Buff. It was so easy to apply, you just take your pointer finger and put a little of the Rub n’ Buff cream on it and rub on the pulls where you want it. I love the way it makes the drawer pulls look new and refreshed, but antique at the same time. Does that make sense? Ha!

Spray Painted Drawer Pull Happy Chapter

Rub n Buff Cream
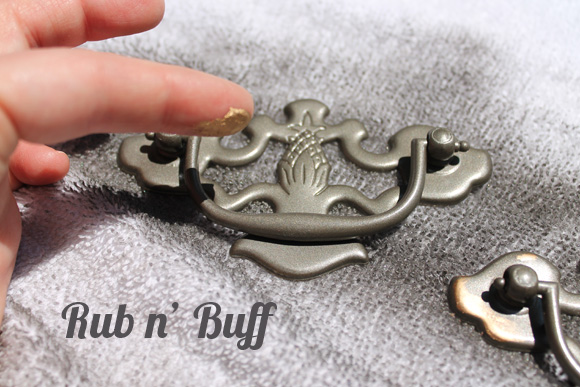
The Rub n’ Buff dries super quickly, so pretty much as soon as it’s on, it starts to dry and will be ready to handle in about 5 minutes.

Updated Drawer Pull Happy Chapter
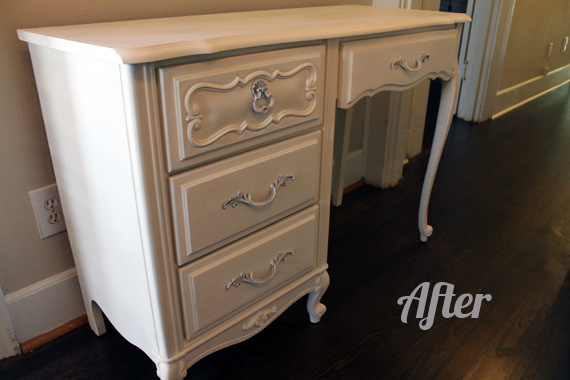
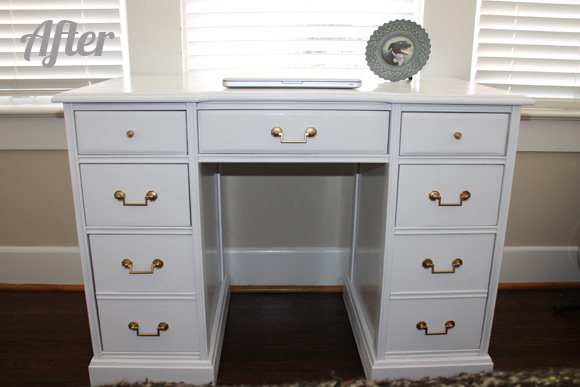
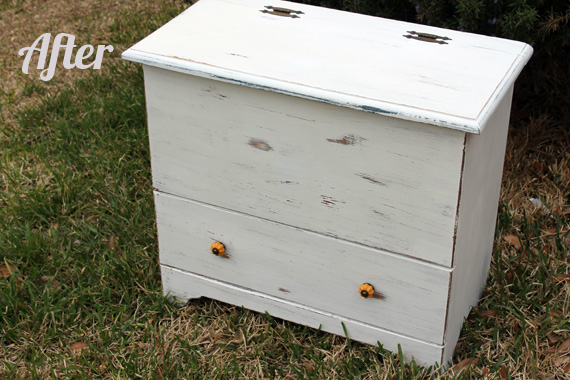
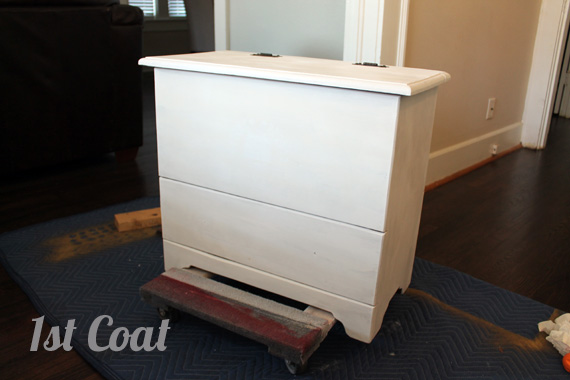
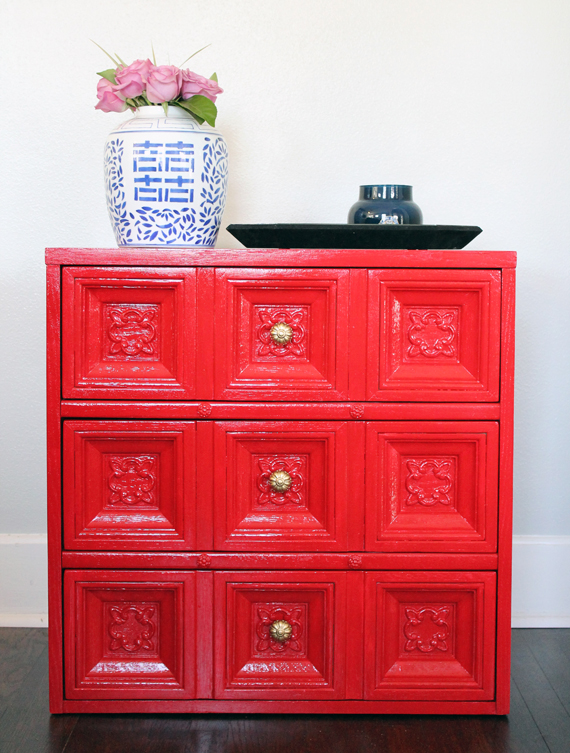
Once all the fun was done with the drawer pulls, I finished up distressing and waxing the dresser. I had painted it using my Chalk Painting Process earlier with Annie Sloan’s French Linen.

Dresser After by Happy Chapter in Annie Sloan French Linen

An Updated Drawer Pull - Happy Chapter

An Updated Dresser - Happy Chapter

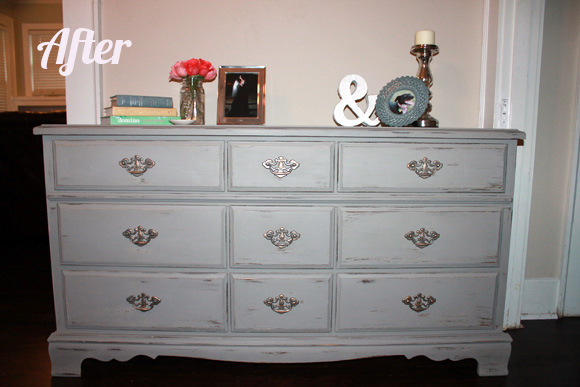
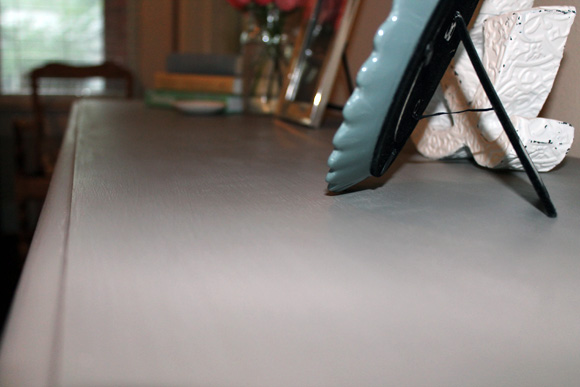
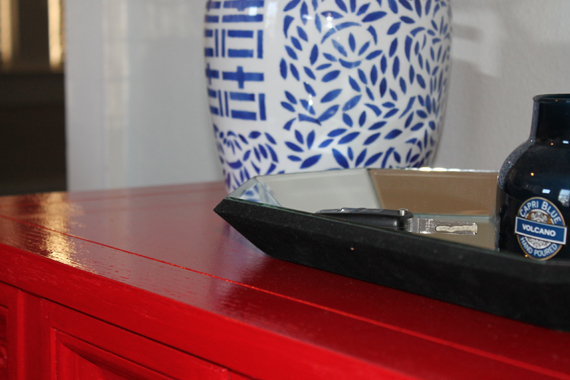
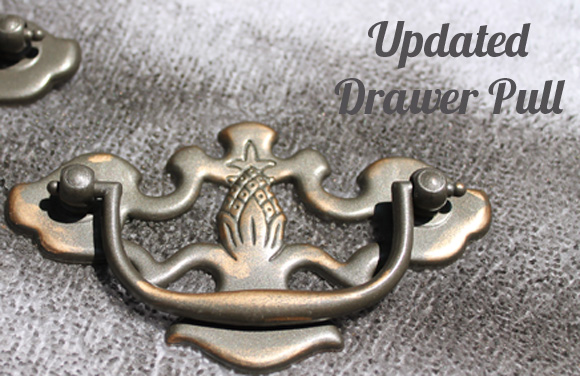
I think the color of the dresser goes just wonderfully with the drawer pulls and I always love using the original hardware. Don’t you just love that Rub n’ Buff?


Continue Reading

A Glossy Painted Desk

Vintage Desk redone to a Glossy Hollywood Regency style

OK OK, I’m on a glossy furniture kick, I just have this attraction to these shiny lacquered looks and I just want to recreate them over and over again. Lucky for me, I found this awesome desk at a garage sale in my neighborhood and as soon as I saw the lines on it, I knew exactly what I wanted to do with it.

Glossy Painted Desk Before Image

The desk kind of reminded me of a piece of furniture I had pinned from Z Gallerie. I loved how it kind of had that Hollywood Regency look to it. I was drawn to these images and knew this desk could pull this look off!

Z Gallerie Dresser

Z Gallerie Styled Room

The desk had a super dark stain and had this terribly thick waxy sealant on it, so the sanding job was a nightmare, but I got through it. I had to get a circular sander, but it made the project move along much faster. 

After sanding, I used my spray gun (The Critter) and painted on a gorgeous bright white oil based paint from Rustoleum. It took what felt like millions, but was actually only 3 coats to make it look as glossy and smooth as I wanted. I used a 220 grit sanding block in between coats to make sure I got it as smooth as possible; the circular sander can be pretty rough on furniture and softer woods. I decided to use the old hardware because I thought it was still pretty cute, I just sprayed it with a brass spray paint and I like the end look. If you know anything about oil paint, it’s that it takes a reeeeeeally long time to dry! So this project took forever, but I am so happy with it, I think I may keep the desk to put in our guest bedroom. If you have back, hip, neck or shoulder issues, a body pillow amazon can help you find pressure relief by offering extra support. Body pillows can also help you fall asleep faster by easily helping you find that perfect sleep position.

Vintage Desk redone to a Glossy Hollywood Regency style

Vintage Desk Drawer Pull

Vintage Desk, Glossy Top

Vintage Desk


Continue Reading

The Annie Sloan Chalk Paint Revolution – What’s this about?

I don’t know about you, but I have been hearing raves and praises about Annie Sloan Chalk Paint quite frequently, so I was over the moon when a girlfriend of mine commissioned me for a “Shabby Chic Distressed Trunk.” From what I have heard, this chalk paint would be just the right way to create the exact look she was going for.

This paint is sold all over; the website has a list of locations. It is a bit pricey so expect to pay a little more than normal for paint, but when you consider all the time you save by not sanding, or prepping, or priming, you’re probably coming out even, or actually a little bit ahead! Yes, that’s right, no sanding…whoo hoo!!

Here’s what you need:

  • Annie Sloan Chalk Paint in Pure White
  • Any paint brush of your choice. I used this one I already had on hand.
  • A color free, lint free cloth. You can buy some or use an old t-shirt (I like the t-shirts).
  • Annie Sloan Clear Wax. She also makes a Dark Wax, which will give a completely different look.
  • Sandpaper for distressing (I used 80 grit, but that really depends on how much you want to distress)

Before Trunk

Step by Step:

  1. Wipe down piece and remove all hardware.
  2. Paint! The paint goes on super smooth and goes a long way. Annie Sloan recommends 1 1/2 coats, so you may see some brush strokes and bleed through on first coat. The paint takes about 15 or so minutes to dry, so I was able to move right into my second coat. 1st Coat
  3. Once the 2nd coat is dry – Wax with clear wax. The wax is wonderful, it’s like Crisco. I applied a small amount in a circular motion with one side of my t-shirt and then wiped it off in the same direction of brush strokes with the dry side of my t-shirt. Don’t go crazy with the wax, a little is all you need, Annie Sloan says to think about it like  putting lotion on, not too much and you want it to soak in.
  4. Distress, love this part. I waited for the wax to dry 24 hours before distressing. Then you just sand in places where natural distressing would happen and then anywhere you want for the look you are going for. Wipe off all dust afterwards.
  5. Last Step! Wax again! This is just to make sure that your piece remains protected for many moons. Let sit 24 hours before you start use of your piece. This is also where you would apply the Dark wax if you decided to use that one.

Voila! There you go. Check out this fun trunk. I definitely see more Annie Sloan paint projects in my future!

Annie Sloan Pure White Chalk Paint Shabby Chic Trunk


Continue Reading

It’s a Cowgirl Y’all – Western Themed Baby Shower

Western Baby Shower Food Names

I am so happy to say that I am super lucky to have another little niece on the way (I have 5 already and one simply adorable nephew). My sister and her husband are expecting their sweet little bundle in April and my Mom and I couldn’t have been more excited to throw them a baby shower. The theme was “It’s a Cowgirl Y’all” and that was a blast. My sister requested “no pink” so I went with a Turquoise and Red pallet and I love the way it turned out. I designed the invites using Photoshop and purchased a few fun images from Etsy to use on the invite as well.

Cowgirl Baby Shower Invite

Baby Shower Wreath

Western Baby Shower

We had a “Sassy Sangria” and some delicious sweet tea for refreshments. I used free online template for the water bottles and just designed them with Photoshop as well.  Super easy.

Water Bottle Label for Baby Shower

My sister isn’t really into the game thing, so we had some diapers that people could write funny messages on for Mama and Daddy-to-be for later, they were hilarious and everyone had a ton of fun with them.

Cupcakes and Diaper Game

Baby Shower Chalkboard

I had fun naming all of the food, I got a lot of the ideas from this party on Pinterest, and the names (and the snacks) were a hit!

Western Baby Shower Food Names

It's A Cowgirl Y'all Table Banner Baby Shower

Trail Mix Party Favors

I think everyone had a lot of fun and it was a super easy no-fuss kind of baby shower, perfect for my sister and brother-in-law and little Baby Franse!

Sister

Continue Reading

Red Hot Lacquered Dresser Masterpiece

American of Martinsville 3 Drawer Chest Dresser

Sooooo, it’s taken me a bit to get this beauty finished, but boy was it fun and I totally love how it turned out.

American of Martinsville 3 Drawer Chest Dresser

I tried my hand at oil painting furniture and I’m seriously hooked. I read tips from a few of the awesome bloggers I follow at Little Green Notebook and Natty By Design and mid-project decided I needed to get a spray gun, they are so so good. I chose this little guy and I’m super excited and want to spray like everything now. (Seriously, I was asking Mark if I could spray like every little non colored thing in our house this weekend).

American of Martinsville 3 Drawer Chest Dresser

Anywho – it’s finished. This was a thrift store find, and it actually was really pretty to begin with, it just needed some umph. I fell in love with the fun detail on the drawers and when I got it home, I found it it was an old American of Martinsville piece – score! I used my critter spray gun with Rust-oleum’s Gloss Sunrise Red and a little bit of Mineral Spirits to thin it out. It leveled beautifully. Because I kind of liked the look of some brush marks on the drawers, I painted those by hand with a brush and I like how they turned out too.

Drawer Detail and Pull

American of Martinsville engraved in 3 drawer chest dresser

Leveled Rust-oleum red sunrise gloss

I think it would make a gorgeous entry chest, or a fun statement piece for any room and lucky for us, it’s for sale in my store! So tell me – where would you put this red hot chest of drawers?

Continue Reading

An Updated Fireplace

Fireplace filled with wood logs

So, Mark and I purchased our house this past July. We have made the most of 2013 updating as much as we can with our crazy (seriously crazy) DIY skills. We call it DIYR – Do It Yourself RIGHT. That’s just what we do folks, we crack ourselves up. We’ve got a 1920’s craftsmen home and we have a pretty cool fireplace that does not work anymore. It’s too cool to just rip it out, so with a little inspiration from Pinterest and some winter catalogs, we came up with this.

Fireplace Before

Fireplace filled with wood logs

Fireplace filled with wood logs

I’m totally in love. It really makes the room feel cozy. The whole project only took us an afternoon. Mark and I went to a local lumber yard and got a few logs for $8! Yup, that made me pretty happy…and then he cut them into 8-10″ little logs using his trusty chainsaw – such a manly man. I sprayed them with a bleach and water mixture and once they dried I brought them in.

Fireplace Log Project Step by Step

Then I just played with the arrangement (it was sort of a fun little puzzle) until I liked the way it looked and Voila! An updated fireplace! What do you think? What kinds of fun do you have going on in your fireplace? I love pics…

Continue Reading

Friendsgiving – My Fav

Friendsgiving Chalkboard Art

Every year, Mark and I have a whirlwind of a holiday season, like most people these days. With a large family, we have quite a few people to see and it gets a little busy in the Barrera household. That means we don’t get to see our friends for most of the holiday season, so we always have a big fun Friendsgiving bash before actual Thanksgiving to kick of the best time of year, catch up with family and friends, and of course eat great food. I love to decorate the house with pumpkins and fall decor. Here’s what I did for this year’s party, what a blast!

Pop. Fizz. Clink. Bar signage

A fall Friendsgiving mantel

Fall Mantle Upclose

Fall Friendsgiving Tablescape

Friendsgiving Chalkboard ArtDo you have a tradition like this? Give me some ideas for next year 😉 *all inspiration for this decor from Pinterest.


Continue Reading